Monday, April 04, 2011

Sneak Peeks of our April Workshop!

If you’re interested in taking part in our April Workshop, here’s what you need to know ……

We’ll be creating an open themed scrapbook layout using papers and embellishments from the new Basic Grey Curio Collection. The Workshop costs €25.00, is suitable for papercrafters of all levels and all materials are supplied. While the papers are beautifully detailed with a vintage feel, they are also suitable for modern photos. So bring along a few of your favourite photos and get scrappin’!

Our monthly Workshops are stand-alone modules so you can just come along any month you choose and take part. Mark the date in your diary, Whitehall Parish Centre, Dublin 9, Thursday 28th April 2011 from 7pm to 10pm.

Sneak Peek copy

Here’s what you’ll need to bring:

Essentials

  • A paper trimmer and scissors
  • Adhesive for sticking paper to paper
  • Strong double-sided tape for making the box flower
  • Photographs: We used two 4” x 6” portrait format photos with white borders but you could use two 4” x 6” landscape format photos or alternatively a larger photo, not exceeding 8” x 6” ,portrait style. Photos can be colour (if they match the papers) or black and white, they can be modern or vintage as the theme of the layout is open.

Bring these also if you have them (we will have some to share on the day):

  • A decorative border/edger punch e.g. Martha Stewart Doily Lace or Martha Stewart Deep Edge Flower but any decorative border/edger punch will do
  • A scalloped circle punch (3” or 2.5”) and a plain circle punch (2.5” or 2”)
  • A paper piercer or needle to make a hole for the brad
  • You may like to ink the edges of the paper, if so, bring along some Ranger Distress Ink in Walnut Stain.

Hope you can make it and if you have any questions just email Annamarie at workshops@thescrapbookstore.ie

Looking forward to meeting you this month!

Saturday, March 26, 2011

A great night at our March Workshop!

Thanks to everyone who came along to our March Workshop last Thursday in Whitehall Parish Centre.  It was another full house and I hope you all enjoyed yourselves.  We used the new Cosmo Cricket Salt Air Collection of papers, chipboard and buttons to create the two layouts with a summer/swimming pool theme.

As promised, here are the finished layouts just in case you didn’t get them finished on the night.

Layout 2Layout 1

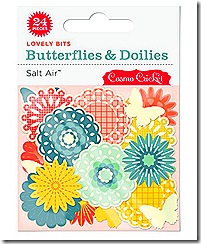
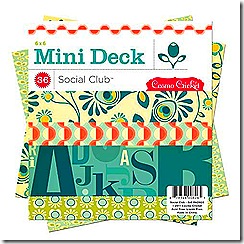
We have two of the new Cosmo Collections in stock at the moment.  The Salt Air Collection and the gorgeous Social Club Collection.  There are 12” x 12” papercrafting kits, 6” x 6” paper pads, buttons, Butterflies & Doilies die cuts and chipboard available.  See all of our new products here.

Salt Air Crafting KitSalt Air 6x6 PadSalt Air ButterfliesSalt Air Buttons

Social Club Papercrafting KitSocial Club Mini DeckSocial Club ButterfliesSocial Club Buttons

The date of our April Workshop is to be confirmed.  With the Easter celebrations, the Centre may be closed for a few days but I hope to have news of the date by Monday.

We have a limited number of class kits available from the February and March Workshops and they are on sale now at TheScrapbookStore.ie here.

Wednesday, February 16, 2011

Our February Workshops in Athlone & Dublin!

Counting down the days until our February Workshop in Whitehall Parish Centre, Dublin 9 on Thursday 17th February 2011 from 7pm to 9pm and again until our Athlone Workshop (venue to be confirmed) on Sunday 27th February from 12pm to 5pm.

This month we're creating a double layout using the new My Minds Eye Fine and Dandy Collections and for added variety you get a choice of our boy or girl paper set. Here are the layouts:

Boy Layout 1Boy Layout 2Girl Layout 1Girl Layout 2


The Workshop is suitable for intermediate or advanced scrapbookers. You will be provided with all of the materials necessary (papers, cardstock and stickers) to complete the layouts but you will need to bring some basics:

  • Paper Trimmer
  • Scissors
  • Craft Knife and Cutting Mat
  • Foam Dots
  • Adhesive for gluing paper
  • Distress Ink (Antique Linen works best)

  • Tweezers

  • Black fine tip felt pen

  • OPTIONAL: If you have some large alphabet letters to suit the colours in the papers bring them along to create a bold title.

  • Photos: For the girl Layout 1 - Two 4" x 6" portrait format photos with white border, for Layout 2 - One 4" x 6" portrait format photo plus three credit card sized photos all with white borders.
  • Photos: for the boy Layout 1 - One 4" x 6" landscape format photo with white border, for Layout 2 - Three 4" x 6" portrait format photos with white borders.


  • If you'd like to book a place at either Workshop, workshop places cost €25.00 and include Kit, refreshments and tuition. Crop only spaces are available at the Dublin Workshop and cost €10.00 where you can come along to shop, crop and work on your own projects.

    Bookings can be made ONLINE or by telephone/text on 086-2065346.

    Hope to see you there,

    Annamarie

    Friday, January 14, 2011

    Whitehall Parish Centre "Inspiration Evening"

    To ease you all into the New Year, we're holding our monthly crop in Whitehall Parish Centre next Thursday January 20th 2011 at 7.00pm.

    Instead of a class, we're holding ..... at the risk of sounding a little like Hyacinth Bucket ;-) .... an Inspiration Evening featuring a layout by the extremely talented Michelle

    Sneak Peek Full Layout

    Sneak Peek 2Sneak Peek 1

    The idea is as follows:

    • Bring along your own crafty tools plus;
    • some favourite paper combinations from your own crafty stash and;
    • use Michelle's layout as inspiration to create your own masterpiece. 

    Michelle will be on hand during the night to assist you with questions and it's an ideal opportunity to use some of those gorgeous papers you've been storing up.  As the background sheet is white, it will match most papers in your stash.

    You can of course purchase the papers Michelle used in her layout.  They're from the Crate Paper Doll Collection and you will also need 1 sheet of Bazzill Cardstock with an Edge, Flower Shape in White to complete the layout.  We have plenty of the Bazzill in the shop.


    Here's what Michelle used in her layout:

    You will also need the following tools:

    • Scissors
    • Paper Trimmer
    • Tweezers
    • Glue dots
    • Foam pads
    • Pink ink pad or if using your own papers bring a co-ordinating ink pad to suit your papers
    • White paint to edge photo
    • Border punch – Michelle used Martha Stewarts doily lace (but it is not working properly so it cannot be used at the class SORRY!) so bring along another fancy border punch.
    • Sewing needle or mini paper stitching machine
    • Circle punches (small and medium)
    • Leaf punches if available

    If you'd like to book a place at our Inspiration Evening please email workshops@thescrapbookstore.ie.  Places cost €10.00 and include tea, coffee, home baking and as always, a warm welcome and great company!

    Wednesday, January 12, 2011

    How to ... A coloured heart with white text - Perfect for Love cards & Valentines!

    Finished Card for Blog

    If, like me, you're a fan of white journalling but never seem to have the right white rub-on or sticker then this tutorial is for you.

    If, like me, you know someone who got engaged over the Christmas period you can use this technique to create a beautiful Engagement card!

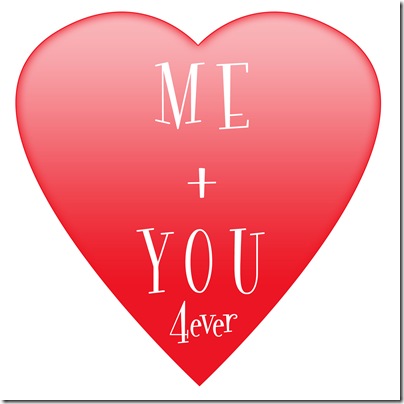
    I used the technique to create this gorgeous coloured heart to use as a centrepiece for an Engagement card (with different wording of course).  The beauty of creating this heart (or you could make a flower, star etc.) is that once you've done it and saved it to your pc you can change the colour and text very easily and adapt it for use in lots of projects.

    To Create the Card I used:
    • The new Pink Paislee Sweetness Collection (available now at TheScrapbookStore.ie) for the background (Yellow), foreground (Blue with roses), accordian flower, and the individual flower on the edge of the heart was cut from the blue with roses sheet.
    • The Martha Stewart Flower Bed Deep Edger Punch to create the accordian flower.
    • A piece of Bazzill Grosgrain Ribbon

    Me & You

    To Create the Heart you'll need:

    • A piece of white cardstock
    • A computer with colour printer
    • Software e.g. Photoshop CS or Photoshop Elements

    Note: I also used some shading and overlay effects on this heart but the following tutorial is for a simple coloured heart without effects.  If you know your way around Photoshop and would like to know how I got the effects on the heart just drop me an email to workshops@thescrapbookstore.ie and I'll send you back the instructions.

    Step 1

    • Decide on the size of card you'll use e.g. I'm using an A5 (210mm x 148mm) size card in landscape format.  
    • To fit on this size card, the heart can be no taller than 148mm or slightly less if you want it to fit perfectly.
    • So I've gone into Photoshop and created a new document and made it 148mm x 148mm as I like my hearts roughly the same width and height, and I've made the resolution 300dpi as I'll be printing it out!

    image

    Your screen should now look like this:
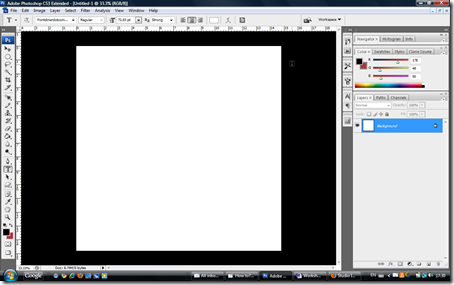
    image

    Step 2 - Drawing the Heart

    Now we're ready to draw our heart!

    • Select the "Custom Shape Tool" from the side menu.  Once you've done this the Custom Shape Menu will appear at the top of the screen.

    image

    • Click on the drop down arrow to the right of the word "Shape" at the top of the screen and you'll see a drop down listing of all the shapes available.

    image

    • Click on the Heart shape and your cursor will turn into a cross. 
    • Using the mouse, bring the cross to the point where you want your heart to start being drawn.  Tip: if you want the heart to fill the whole box then position your cursor about 1mm from the top left hand corner.
    • Press the left button on your mouse and drag the cursor down and across the page, the heart will be drawn as you do this.  Once you hold the button as you're dragging, the heart will continue to be drawn, once you let go of the button the heart will be complete.
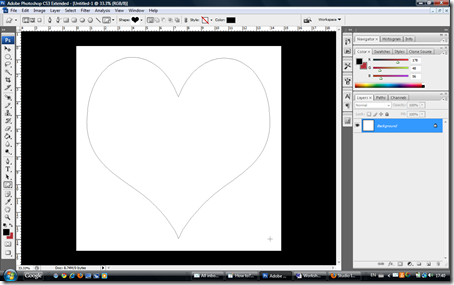
    image

    • You can now use the "Move Tool" to move the heart around the box so it's positioned exactly where you want it.
    • If the heart isn't the correct size, you can adjust it by clicking and dragging any of the small boxes around the heart (holding the shift key as you're doing this keeps the heart from becoming distorted)
    • You should also notice the "Layers" palette on the right hand column of the screen.  It now shows a new layer with a heart shape and beside the shape it shows a colour swatch (the default colour is black).
    • To change the colour of your heart simply double click in the colour swatch box and pick your colour using the colour picker or by dialling in an RGB reference or # number.  For our red heart we used a #number of b23038

    image

    Step 3 - Creating the Text

    • To create the text, select the Text Tool from the left hand column, change the font to one of your choice (we used Fontdinerdotcom Sparkly font at 72pt size - available FREE at www.fontdiner.com).
    • Make sure the text colour is set to WHITE and type in your words.
    • Once you've typed in the words, you can use to the Move Tool to move the text block to position it correctly in the heart if necessary.
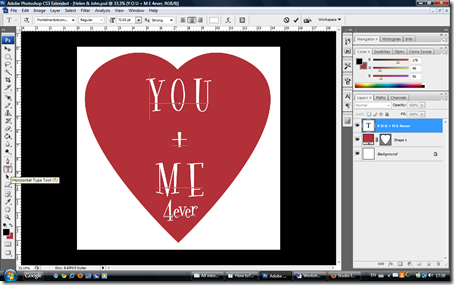
    image

    Step 4 - Save and Print

    • Now, simply save the document and print it out onto White Bazzill or similar and cut it out with a  scissors.