
Over at the ScrapWest blog this week's theme is a celebration of blogs! So we're asking everyone to join in and share some of their crafty secrets on their blogs and we'll link to them.
I love downloading free fonts from the internet and use computer printed journalling in most of my scrapbook layouts. It wouldn't be possible to have stickers, stamps or rubons for every occasion but I can always find the perfect font to match every project. One of my favourite sites for free fonts is http://www.dafont.com/ and one of my favourite fonts is called "Mom's Typewriter". I find it suits lots of layout styles as its kind of rustic and distressed!!
I hope you can see the screen snapshots ok - they seemed to get smaller once I uploaded them!!! BTW I used Windows XP.
Step 1 - Go to http://www.dafont.com/ and find the font you're looking for either by style or by name. In this case I put the words into the search facility. Once the font appears you'll see a box on the right hand side of the page which you click to download the font to your pc.

Step 2: Once you've clicked "Download" a pop-up box will appear asking if you want to "open" or "save". Always choose "save".

Step 3: Once you've clicked "save" you'll now have to choose where to put the file containing the font. It's best to keep all your fonts in the one place so you should use the "Fonts" folder which should already be on your hard-drive. It contains all the preinstalled fonts which you use in Microsoft Word e.g. Arial, Times New Roman etc. If you're having trouble finding it, it should be at C:\WINDOWS\Fonts. Once you've opened the fonts folder click "Save" and the font will be saved into the Fonts file as "Mom's Typewriter".

Ok, you've now saved the new font in the proper folder. Now it's time to install the font into Word so that you can use it in your journalling.
Click on the "Start" button at the bottom left of your screen and go to "Control Panel". If you're not using Windows XP you might have to get to your Control Panel another way.

Once you've clicked "Control Panel" this new screen should appear. What you're looking for here is the "Appearances and Themes" category. Once you've found it, click on it once.
 Once you've clicked "Appearance and Themes" this new screen should appear. On the left hand side of the screen there is an icon for the "Fonts" folder. Remember this is where you saved your new font to. Click on the "Fonts" folder icon.

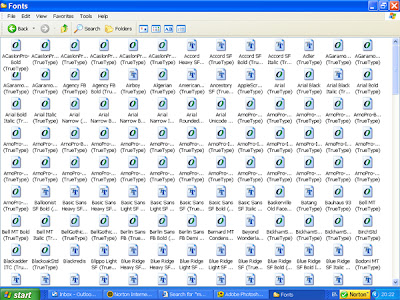
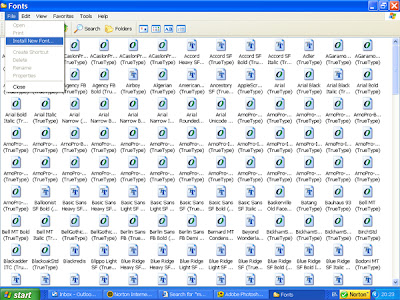
To install the font so that you can use it in Word. Click "File" at the top left of the screen. Now move the mouse down and click "Install Font".
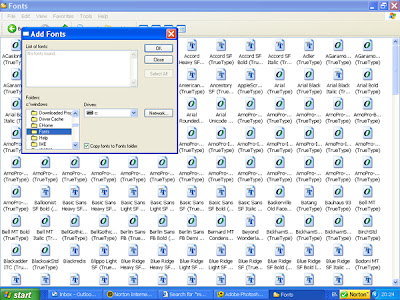
A new pop-up window will appear asking you to choose the location of the fonts you wish to install. Again choose C:\windows\fonts
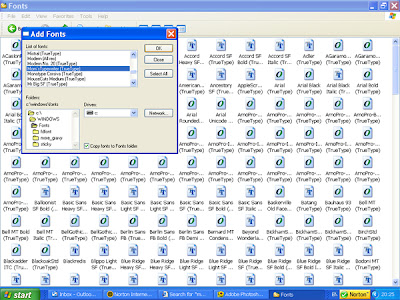
The list of fonts will then appear in the top left window of the pop-up and you simply click on the name of your new font "Mom's Typewriter" and then click OK and voila! your font is now installed.
To check if you've done all of it right open up Microsoft Word and from the drop-down Fonts menu you should be able to find the name of your new font in alphabetical order all ready to use.

Once you've done all the hard work just type in your journalling in your new font. Then to make sure it fits into your layout print the journalling onto a plain A4 sheet. Choose the paper you want the journalling on in your layout and cut it to a size to fit onto the layout. Then, using removable!! adhesive, stick the piece of paper or card over where the journalling printed and run it through the printer again. The journalling will now be exactly where you want it. Just remove the cut piece and add it to your layout, card or other project.
I hope you find this useful. It looks so good it encourages me to add in that priceless journalling without having to use handwriting.
Don't forget to check out all the other crafty ideas on the ScrapWest blog and leave your comments with a link to your creations (if you're feeling inspired).
Anyone who leaves a comment here will have their name put into a raffle for a gorgeous prize of a new Basic Grey Collection Pack and I'll announce the winner next Friday.
19 comments:
great idea Annamarie - I always forget how to download fonts and spend ages trying to figure it out every time! Great prize too!!!!!
Thank you for fab photo instructions! I always do my journalling in handwriting, but would love to try your suggested ideas. Thanks again, found it very useful!
Super instructions AnnaMarie, think I might even be able to manage them, love the idea of running the paper through the printer twice.....how obvious..now why didnt I think of that !!!
I am going to print these out as I can never remember how to do it and the office techy to do one offs for me. Thanks for this Annamarie.
Cool. Great tutorial. If you use GIMP there are loads of great fonts made for it out for free as well:)
I really wanted some free fonts, thanks for introducing the site and step by step tutorial.
This is fab Annamarie, I always forget where I should put the darned things! Thanks a mil!
Great insturctions Annamarie, thank you - I always seemed to mess up whilst downloading fonts but not any more!! I'm going to print this tutorial out and stick it up beside my computer. Thanks again :)
Great instructions Annamarie, thank you for sharing this, looking forward to giving it a try :-)
Great instructions - clear, step-by-step and fab screenshots. I love Mom's Typewriter too - off to install that right now!
Thanks for sharing
dafont is my favourite site. DD, DS and I have downloaded dozens of fonts over the past weeks. It's so versatile. Thanks, Annamarie.
Great idea Annamarie one to save =0)
thanks Annamarie, it's great the way new fonts can change the look of your lo's
thanks for sharing :)
Very detailed tutorial Annamarie - Thanks :)
Printed this out- great easy instructions for saving them in the same place!!!!
Thank you for that....I've never downloaded fonts, I'm inspired to give it a go now :-)
Was I dreaming when I thought I left a comment here. Anyway I'll do it now. Thanks for the instruction I'm always forgetting how to do this.
Wow great demo there Annemarie!
Hope you're doing well
x
Thanks everyone for all the lovely comments. I'm so glad you liked the tutorial. I've put all the names in a hat type thingy and the winner is ....... JIM JAMS!!! I haven't got your email so if you want to send me a message on info@thescrapbookstore.ie then I'll send out your prize. Congratulations!!!
Post a Comment